Friday, July 30, 2010

Organize Your Scrapbooking Supplies

Do you LOVE our dimensional elements, but they are getting out of hand? Do you have too many of them and they are out of sight and out of mind?

Here is your answer. I took our My Acrylix
Organizer ($12.945) and our Stamp Organizers ($5.25 for 3...these are the same sturdy organizers that our stamps come in) and filled them with our dimensional elements alphabets. Now I can grab the box and go! I have all my alphabets with me when I need them!

If you want one for each letter like I have here, you will need 2 My Acrylix Organizer boxes to fit all 26 letters in the alphabets. I find when I am organized not only do I feel better and have less stress, but I also know what I have and then I use what I have...wow...what a concept! LOL


It's time to get your dimensional elements organized! And just in case you were wondering what to do with these "white" letters...they are so fun...you can stamp them, sponge them, cover them with patterned paper or just leave them white! The possibilities are endless!

Tuesday, July 27, 2010

Art & Soul Episode - Summer Splendor

Are you ready for even MORE ideas? Then visit my website (click on CTMH TV) for our recent Art & Soul episode. It is only 12 minutes and 42 seconds FILLED with some GREAT Summer ideas.

You will learn how to get a sentiment from the stamps that you already own...with a little "tape" you can use your current stamp sets to make even more sentiments. You will also see some cute items to make your summer picnic or get together even funner! And new techniques using our circle punch.

So get out there and check out our new Art & Soul episode!

Friday, July 23, 2010

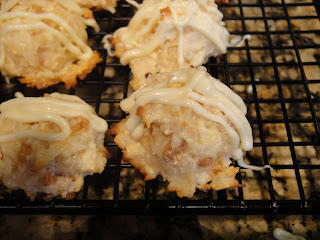
Easy Macadamia Macaroons

Do you like coconut cookies? I don't, but my husband does and so does my (former) neighbor. So I whipped these up and they LOVED them. It is a recipe from Sandra Lee's Semi Homemade Magazine...July/August issue.


7 ounce package sweetened flaked coconut
1 cup dry roasted macadamia baking pieces, Mauna Loa is what she used
1 can (14 ounce) sweetened condensed milk
1/2 t vanilla extract
1 sleeve of saltine crackers, (about 30) finely crushed, she used Nabisco
3 egg whites
6 ounces of white chocolate baking squares, Bakers brand

Preheat oven to 350 degrees. Line a 15 x 10 inch jelly roll pan with parchment paper. Spread coconut and macadamia pieces in a single layer in prepared jelly roll pan. Bake, stirring frequently, for 10 - 12 minutes, or until lightly toasted.

In a large bowl, combine condensed milk and vanilla. Stir in coconut mixture and cracker crumbs. Stirring until well combined.

In a medium bowl, beat egg whites at high speed with an electric mixer until stiff peaks form. Gently stir into coconut mixture. Spoon tablespoon size of the mixture on cookie sheets that have been sprayed with Pam. Place them 2 inches apart.

Bake for 12 - 14 minutes or until edges of cookies are lightly golden. Remove to wire racks; cool completely (about 1 hour). Melt chocolate according to package directions; drizzle over cookies. Chill until chocolate is set (about 30 minutes).

I have to say, they were not a cookie I had a lot of faith in, but they tell me if you like coconut, you will LOVE these. They loved them so much, I made them again a week later. LOL It's always a good thing when they like what you bake!

Tuesday, July 20, 2010

Scrapbooking in the Dark

This is even a new one for me. Last week about 15 minutes after my Wednesday group arrived, the tornado sirens went off. We headed to the storage area, and they brought their catalogs, order forms and shopping lists. LOL Luckily there were no tornados, but the power went out.

This first picture you see them in the storage area. It looks light in there because I had to put my flash on. It was real dark.

After the sirens stopped we came back in my scrapbooking area, but the weather was still raining sideways, so they couldn't leave. So, we did what any good scrapbooker would do, we cut our paper and proceeded. LOL
I even got help from my husband. He held a flashlight over one set of tables and I held them over the others. It was a little crazy, but defiantly a first for me.

After about an hour, the stormed passed and we saw this amazing double rainbow. It got somewhat lighter so everyone moved to the tables by the windows for that extra light. It was definitely an adventure. They were able to leave once it started getting dark again...it had stopped raining...so that was good.
The power was out for 4 hours and the house was getting warm, so we were happy to have it come back on again. Just goes to show you...every moment is a scrapbooking moment!


Friday, July 16, 2010

Last Weeks Excitement

Last week was a very exciting time! It was Close to my Heart's Annual Convention. WOW...what a week! SO many cool new products, new catalog, new ideas, hanging out with friends, pajama/catalog party, but I have to say my highlight was 2 things.

First I was once again asked to be on CTMH's Advisory Board. YIPPEE! I have known about this for about a month, but I couldn't say anything about it. I was about to explode with excitement...but was able to hold it in until Friday night. Here I am on stage with the other Advisory Board members.

Then, the part I didn't know...I was SEVENTH in sales for the COMPANY! SEVENTH IN THE WHOLE COMPANY! WOW! I was in SHOCK!

And THANK YOU to all my customers who helped me get there! I am still pinching myself! If you would like to be part of an AMAZING company, let's talk. It truly is the best job I ever had!

Tuesday, July 13, 2010

You are Sweet Candy Sticks

I created these cute M & M sticks for my unit swap. They are just little 1 x 8 inch bags (you can get them from clearbags.com) and I stamped a cute little tag and tada! Very cute, quick and easy. And I am just loving this stamp set! It is You're Sweet (B1351 $13.95) It has other fruit in it too. Like a slice of orange (or you can use it for a lime or lemon), apple, strawberry and a lemon. VERY CUTE! I just can't get enough of this Cherry O kit. I hope you are having as much fun with it as I am!

Friday, July 9, 2010

Kiss Your Stamps!

Have you ever wished your solid stamp had a pattern? If you "kiss" your stamps, you can make your own pattern! Ok...don't really KISS your stamps with your mouth...you KISS the stamps on another stamp.

Here's how you do it. You ink your solid stamp, then you press that stamp on a patterned stamp. See second picture. The pattern of the one stamp will pull ink off your solid stamp. Then you stamp it on cardstock. See how the pattern is now on the solid stamp. It's pretty cool.


I took that flower stamp and cut it out and made these cute little bookmarks. I am at our annual convention right now and this is what some of my friends and my roommate got in their little gift bags. They were fun to make, very easy and very inexpensive! I used our Noteworthy stamp set (D1412 $22.95) for the houndstooth pattern and the grid pattern on the solid stamp, The flower is from A Posy (A1102 $7.95). The crochet flowers are from White Daisy Mini Medley (Z1136 $7.95) and the corduroy brads are from our Autumn Garden Mini Medley (Z1119 $5.95) blue ones are from our Winter Mini Medley (Z1120 $5.95). The bookmarks can be any size you want. I put the flowers at the top so that part can hang out of your book! Give them a try!

Tuesday, July 6, 2010

July Group Layouts


Have I told you how much I LOVE THIS KIT! This is our Cherry O kit that my groups are making in July. This paper goes with EVERYTHING! You don't need pictures of cherries to make this layout. I used it for my birthday layouts. Or course I made sure my husband had pieces of cardstock in his hand when he went to get the cake! LOL The funny thing is they remembered the cardstock pieces from when I ordered my anniversary cake! lol

So check out what pictures you can use on these layouts and come make them in July!
Check out my calendar on my website or email me and we can get you set up to come as a guest! You will happy that you did!

Friday, July 2, 2010

July Stamp of the Month

This cute card is made with our July stamp of the month, Happy Forever.

For the paper I used our paper from the Jingle kit (using what I have) and our Originals How To Book, pattern Heartfelt Classic page 71.

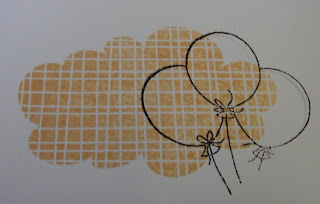
I am highlighting this card because I used a cute technique on the balloons. Here's how I did it.
First you find a textured stamp. For the tulip balloon I used the houndstooth stamp from our Noted Background stamp set, Olive balloon is the stars from our Cupcake Sprinkle stamp set and the Creme Brulee balloon is from our Over the Rainbow stamp set.
The pictures are of the Creme Brulee cloud. First you stamp the cloud on your cardstock using creme brulee ink. Then I took the hedgehog stamp from our Happy Forever July stamp of the month and ink in black, then stamp over the cloud. Then cut out and attach to your card. This is a VERY easy technique, and it is great for when you don't want to color your stamps.

Give it a try!